Vendor Management
The Vendors module allows you to manage all vendor relationships, categorize vendors by type, and maintain complete contact information for your supply chain partners.
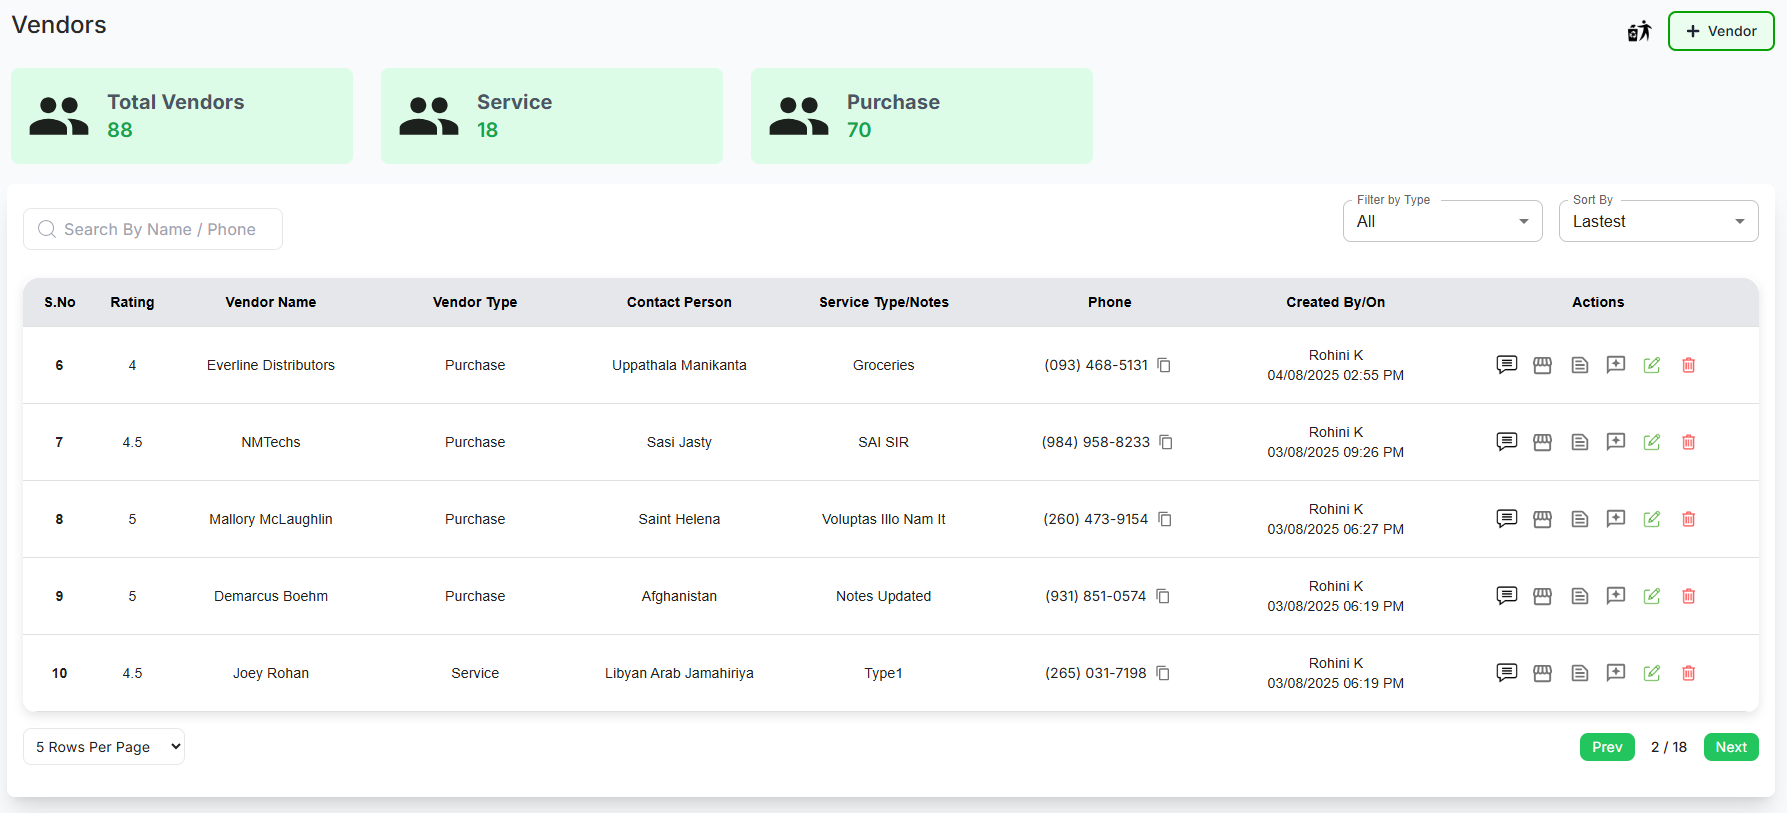
Vendors Dashboard
✅ Key Features:
- Total Vendors: Complete count of all vendors in your system
- Purchase Vendors: Vendors used for regular procurement
- Service Vendors: Vendors used for service needs
- Service Vendors: Vendors used for service needs
Actions
-
Comments: Click the "
 " icon to access the updated history.
-
Products: Click the "
 " icon to view the list of products.
-
Add Notes: Click the "
 " icon to add notes for vendors or products.
-
Rate & Review: Click the "
 " icon to provide or update ratings.
-
Edit Vendors: Click the "
 " icon to modify the details of a specific vendor.
-
Delete Vendors: Click the "
 " icon to remove a specific vendor, then confirm by clicking OK.
Adding a New Vendor
✅ Step-by-Step Guide:
- Access the Create Vendor form by clicking the "Add Vendor" button
-
Complete required fields (marked with *):
- Vendor Name - Official business name
- Phone - Primary contact number
- Vendor Type - Select from dropdown Vendor Type:
-
Service - Select this option for vendors who
provide services like consulting, maintenance, or repairs. After
selection:
- The Service Details section will expand
- Search for and select the specific service from the dropdown
- Click the Edit button to modify service details or add new services to the system
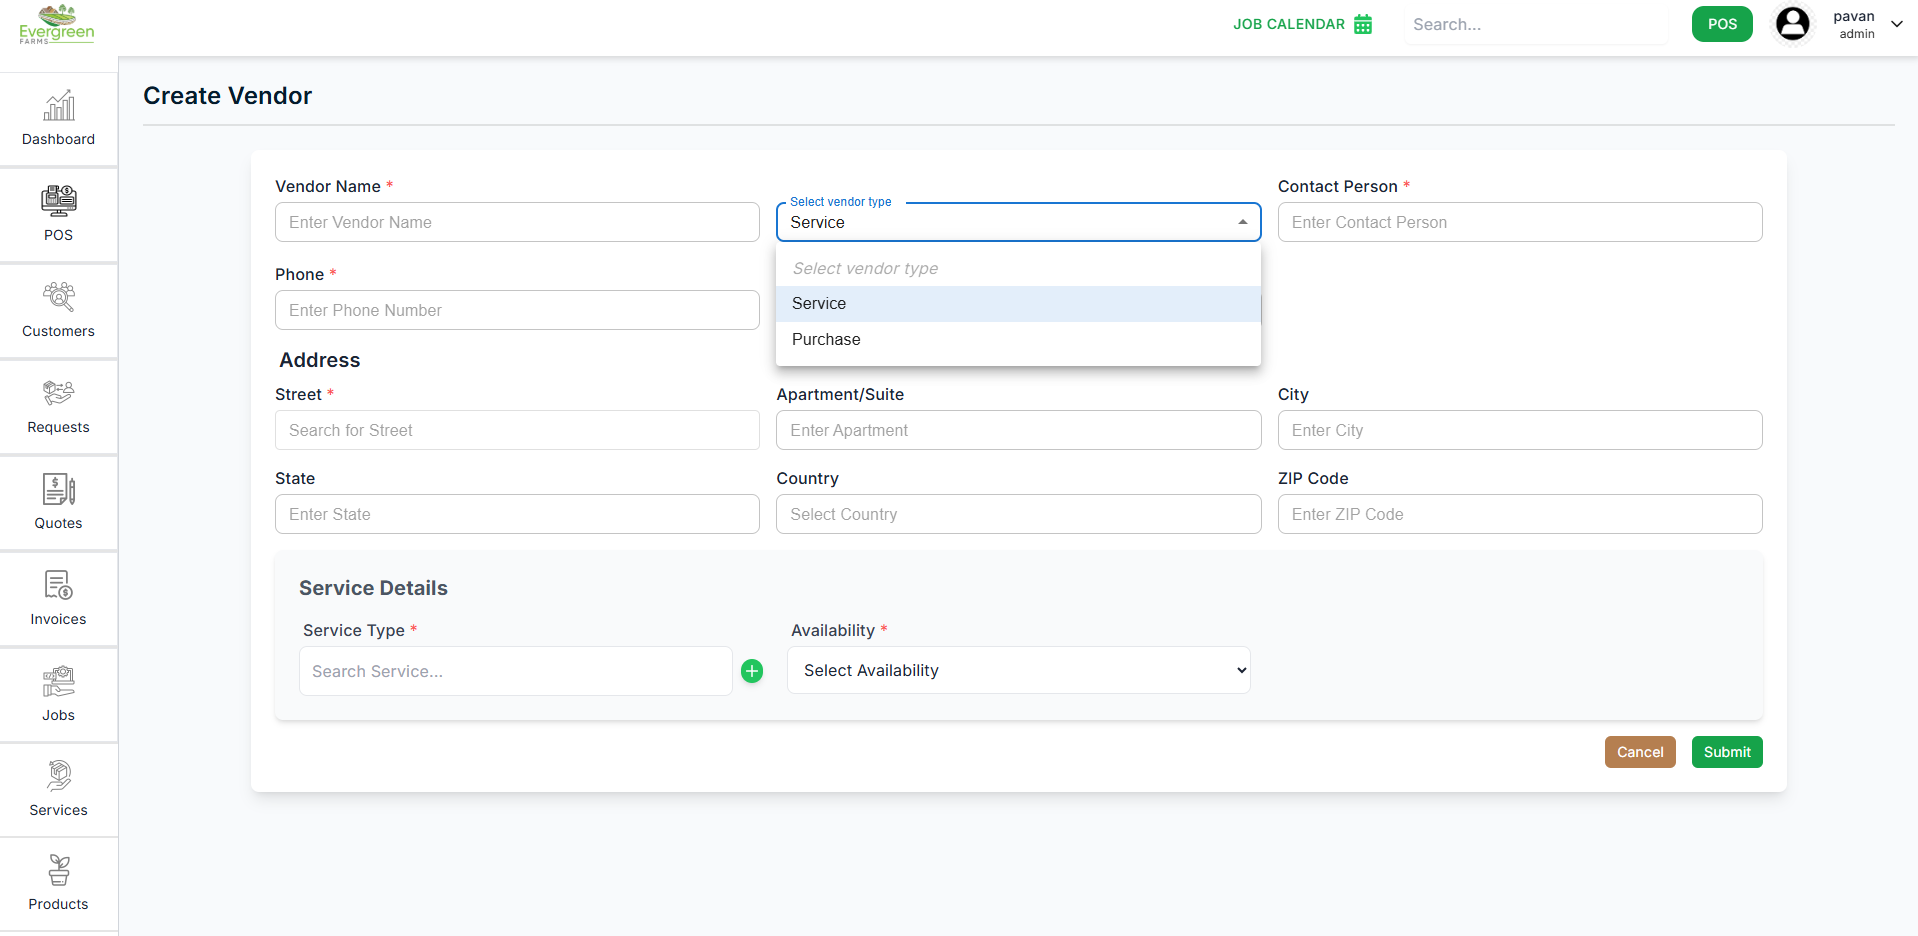
-
Purchase - Select this option for vendors who
supply physical products or goods. After selection:
- The Purchase Details section will appear below
- Products + - Shows products already linked to this vendor
- Search and select product - Use dropdown to find and add new products
- Payment Terms in Days* - Enter number of days to pay invoices (e.g., 30 for Net 30)
- Delivery Frequency* - Select how often they deliver (Daily, Weekly, Monthly, etc.)
- Contact Person - Primary representative
-
Provide address information:
- Street address
- Apartment/Suite (if applicable)
- City
- State/Province
- ZIP/Postal Code
- Country
-
Enter optional details:
- Email address
- Service Type/Category
- Additional notes
- Save the vendor record by clicking "Submit"

Searching and Filtering
✅ Efficient Vendor Lookup:
-
Search By Vendor Name:
- Type any part of the vendor name
- Results update in real-time
-
Filter by Vendor Type:
- View all vendors
- View only Service vendors
- View only Purchase vendors
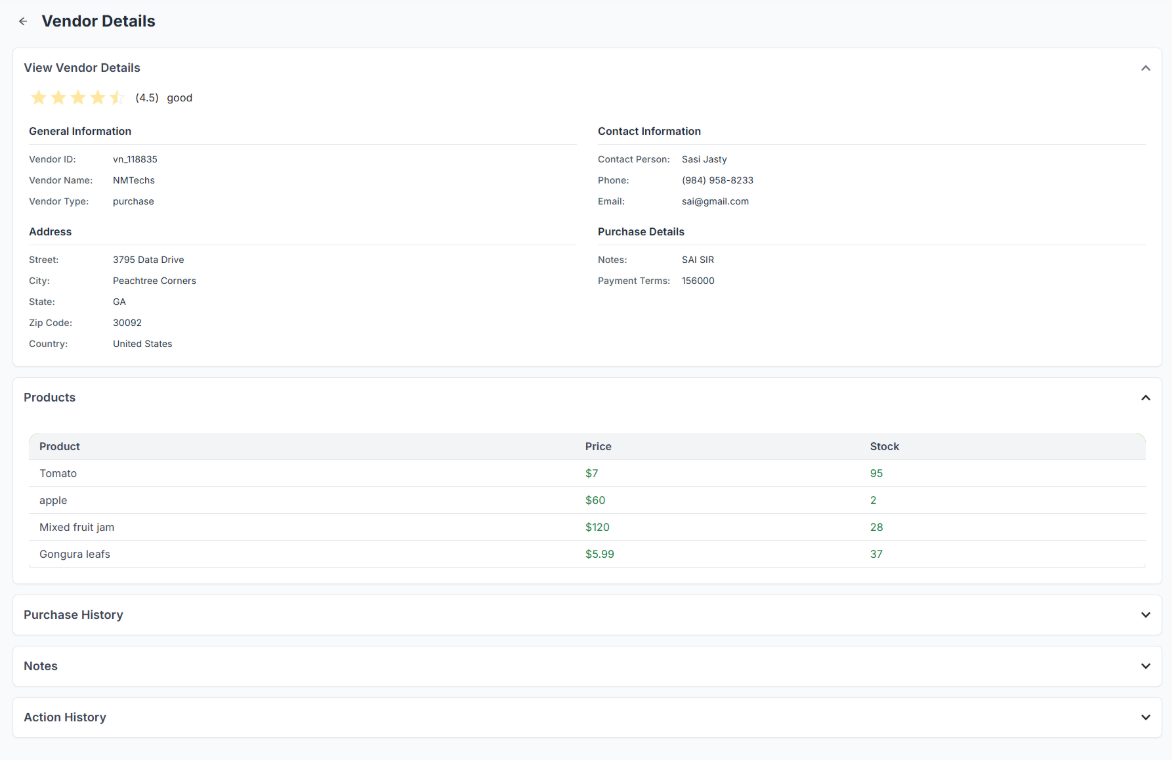
✅ Vendor Details
Click on a specific vendor to explore their detailed profile with elegance and ease.
- View Vendor Details: Access a comprehensive overview of the vendor's profile.
- Rating: Admire the vendor's overall rating and insightful feedback status.
- General Information: Discover essential details about the vendor.
- Address: Unveil the vendor's complete and precise address information.
- Contact Information: Peruse the details of the vendor's designated contact person.
- Purchase Details: Explore notes and payment terms associated with the vendor.
- Products: Browse a curated list of the vendor's offerings, including pricing and stock levels.
- Purchase History: Review an elegant record of the vendor's transaction history.
- Notes: Add or appreciate additional notes pertaining to the vendor.
- Action History: Trace the refined history of actions performed on the vendor's profile.
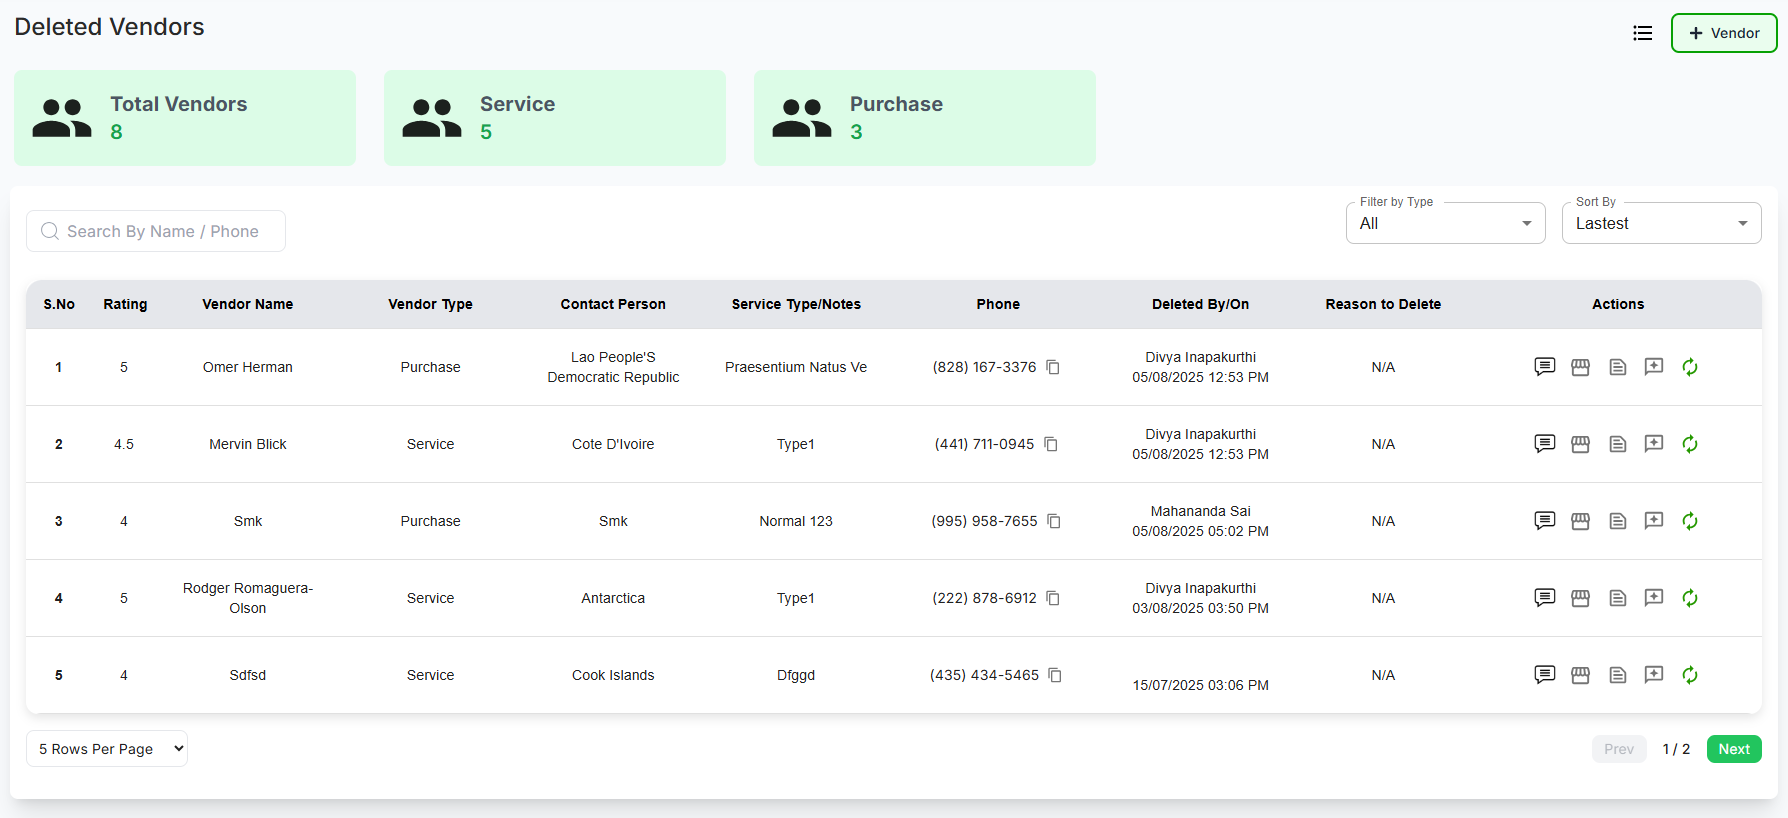
✅ Deleted Vendors
Click the " " icon to gracefully access the list of deleted vendors, where you can
also seamlessly restore them as needed.
" icon to gracefully access the list of deleted vendors, where you can
also seamlessly restore them as needed.
- View Deleted Vendors: Explore the list of removed vendors and their details.
- Total Vendors: See the overall count of vendors, including Service and Purchase categories.
- Search by Name/Phone: Use the search bar to find specific deleted vendors.
- Filter by Type: Apply filters to view vendors by type (e.g., All, Service, Purchase).
- Sort By: Arrange the list by preferences such as Latest.
-
Vendor Information:
- S.No: Unique serial number of the vendor.
- Rating: View the vendor's rating score.
- Vendor Name: Name of the deleted vendor.
- Vendor Type: Category of the vendor (e.g., Service, Purchase).
- Contact Person: Name of the contact individual.
- Service Type/Notes: Details or notes related to the vendor's service.
- Phone: Contact phone number of the vendor.
-
Deletion Details:
- Deleted By/On: Information on who deleted the vendor and the date/time.
- Reason to Delete: Reason provided for the vendor's deletion (if applicable).
-
Actions:
- Comments: Access or add comments related to the vendor.
- Products: View the vendor's product list.
- Add Notes: Include additional notes for the vendor.
- Review & Ratings: View or Edit Ratings.
- Restore Vendor: Click to reinstate the deleted vendor.
Pagination Controls
Navigate through partner records efficiently:
- Use the rows per page dropdown (▼) to select display density
- Default shows 10 rows per page (e.g., 5, 10, 15, 20)
- Use pagination controls when you have more vendors than fit on one page (e.g., Prev, Next)

Best Practices
✅ Vendor Management Tips:
- Keep vendor contact information current with regular reviews
- Clearly categorize vendors by type for quick access during emergencies
- Include detailed service categories for better vendor selection
- Use the notes field to record special terms or conditions
- Verify phone numbers and emails during annual vendor reviews