Complete Catalog & E-Commerce Flow Guide
This comprehensive guide covers the entire flow from creating catalogs to order management, including add to cart, checkout, coupons, delivery configuration, and where to find all details.
Complete Flow: Create Catalog ➝ Catalog List ➝ E-Commerce Display ➝ View Products ➝ Add to Cart ➝ Apply Coupons ➝ Checkout ➝ Order Placement ➝ Order Management
The catalog system allows you to create time-based product collections that automatically appear in your e-commerce store. Customers can browse catalogs, add products to cart, apply coupons, and place orders with pickup or delivery options.
Catalogs automatically appear in e-commerce only during their active period:
- Start Date ≤ Current Date ≤ End Date
- Catalog must be Active (isActive = true)
- Catalog must not be Deleted (isDeleted = false)
📍 Where to Find:
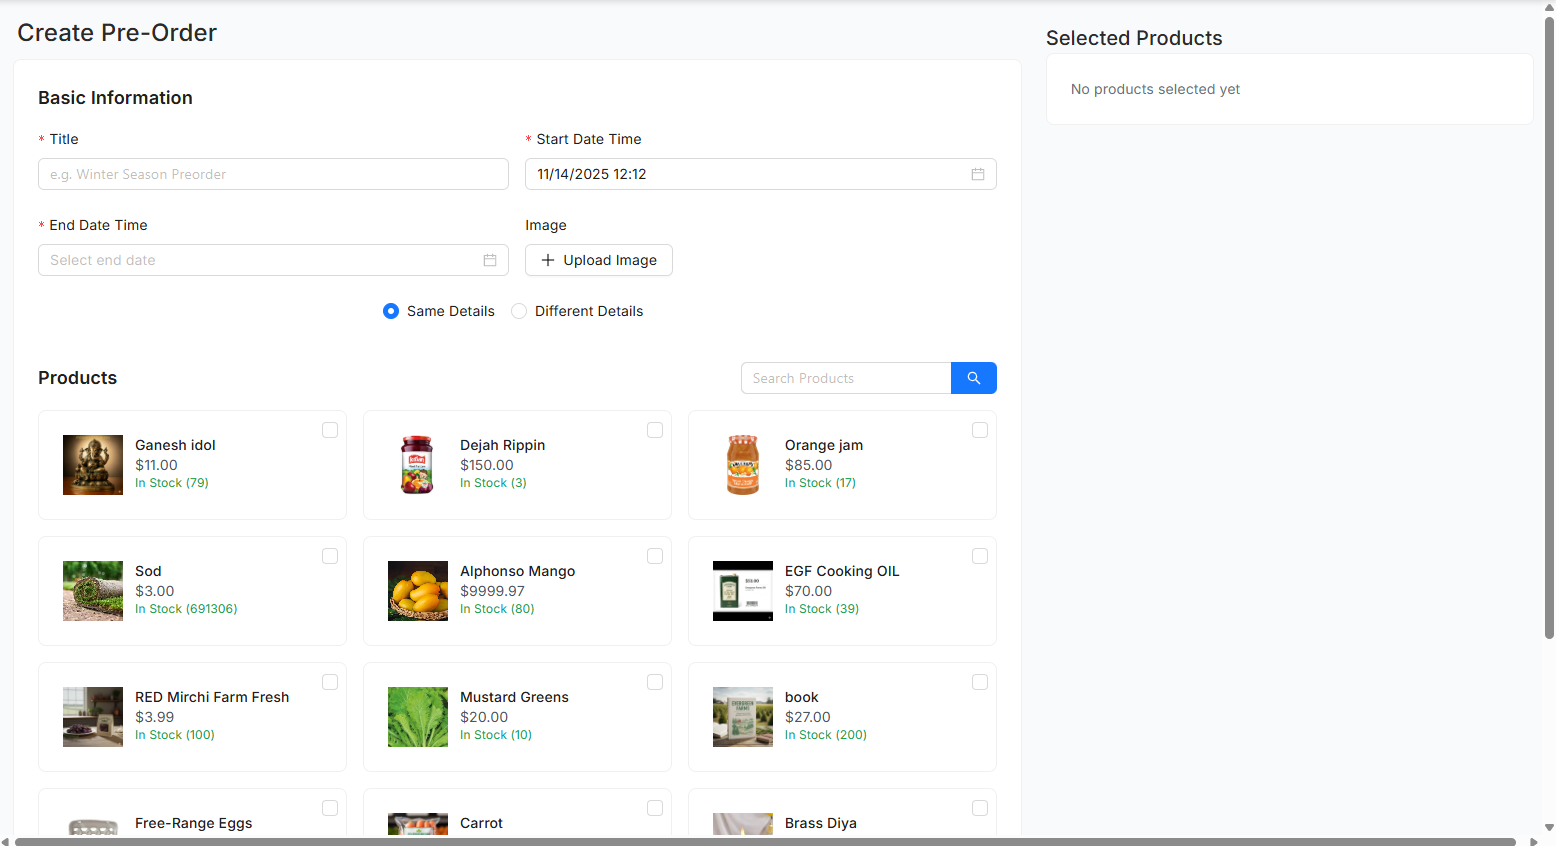
Admin Panel → Preorder Catalogs → Click "+ Catalog" button
✅ Steps to Create:
- Navigate to Preorder Catalogs page from the main menu
- Click the green "+ Catalog" button
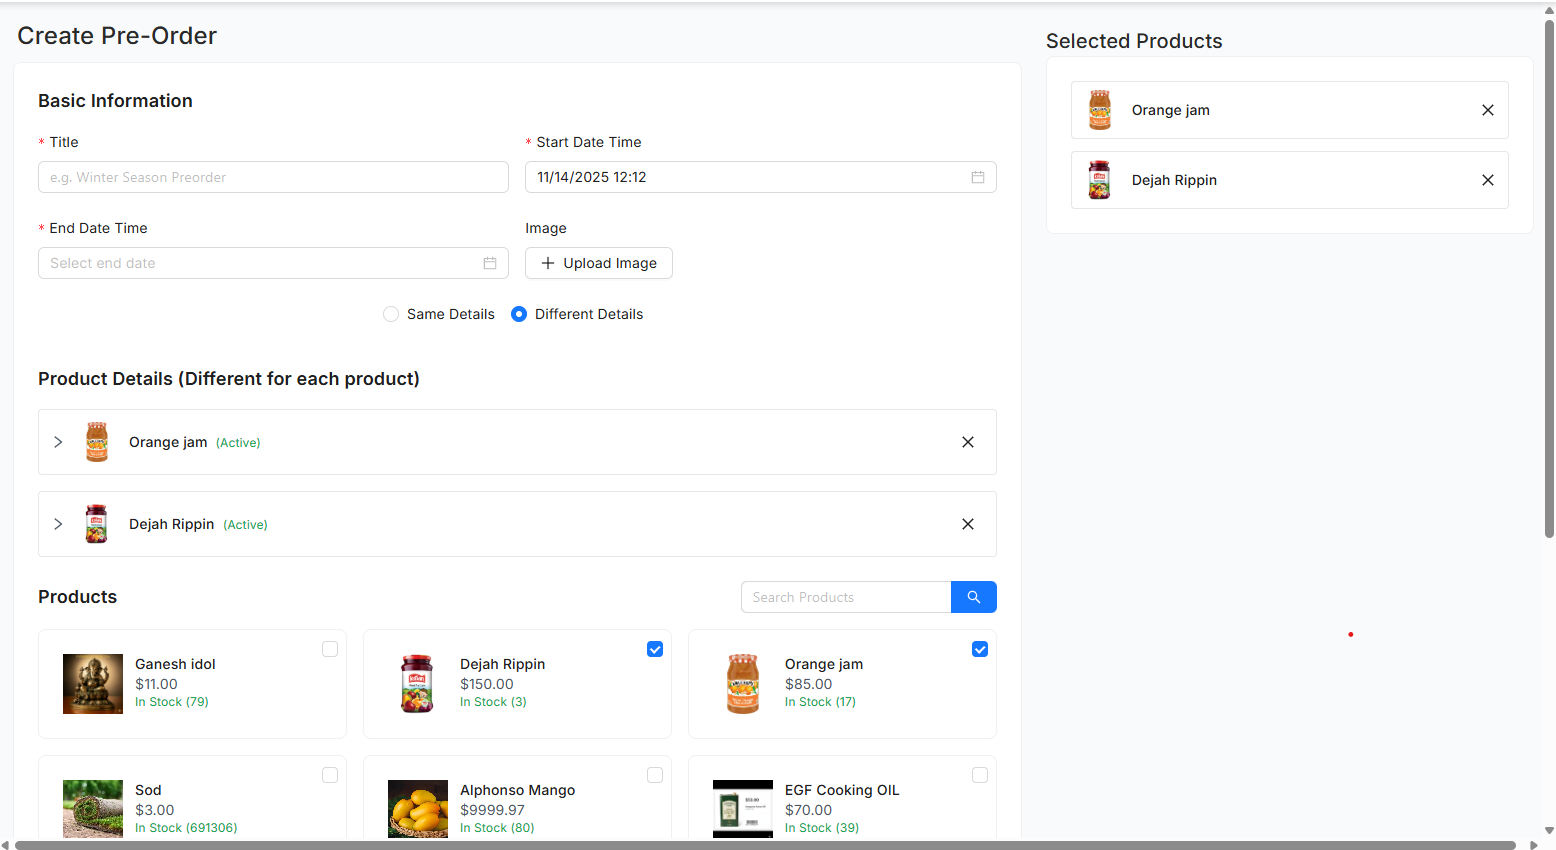
- Fill in catalog details:
- Title: Name of your catalog (e.g., "Spring Plant Sale 2024")
- Start Date: When catalog becomes active in e-commerce
- End Date: When catalog expires and is removed
- Catalog Image: Upload banner image (recommended: 1200x400px)
- Select Fulfillment Method:
- Pickup: Customers pick up at selected locations
- Delivery: Orders delivered to customers
- Both: Offer both pickup and delivery
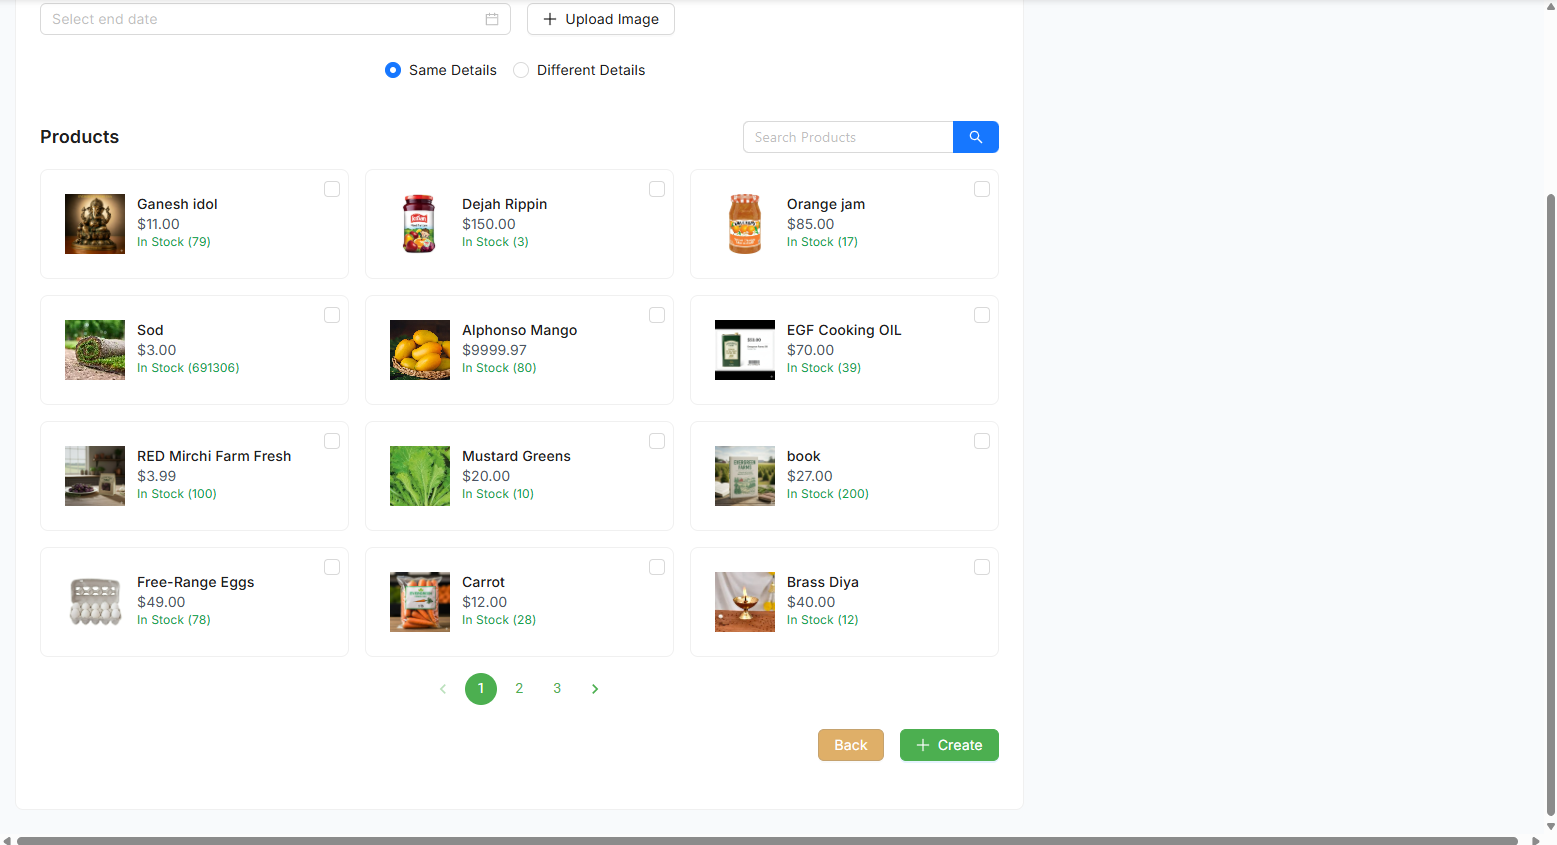
- Add Products:
- Search and select products from inventory
- Set product-specific details (notes, availability dates)
- Configure pickup locations for each product
- Set pre-order limits per product
- Click "Save Catalog" to create
📍 Where to Find:
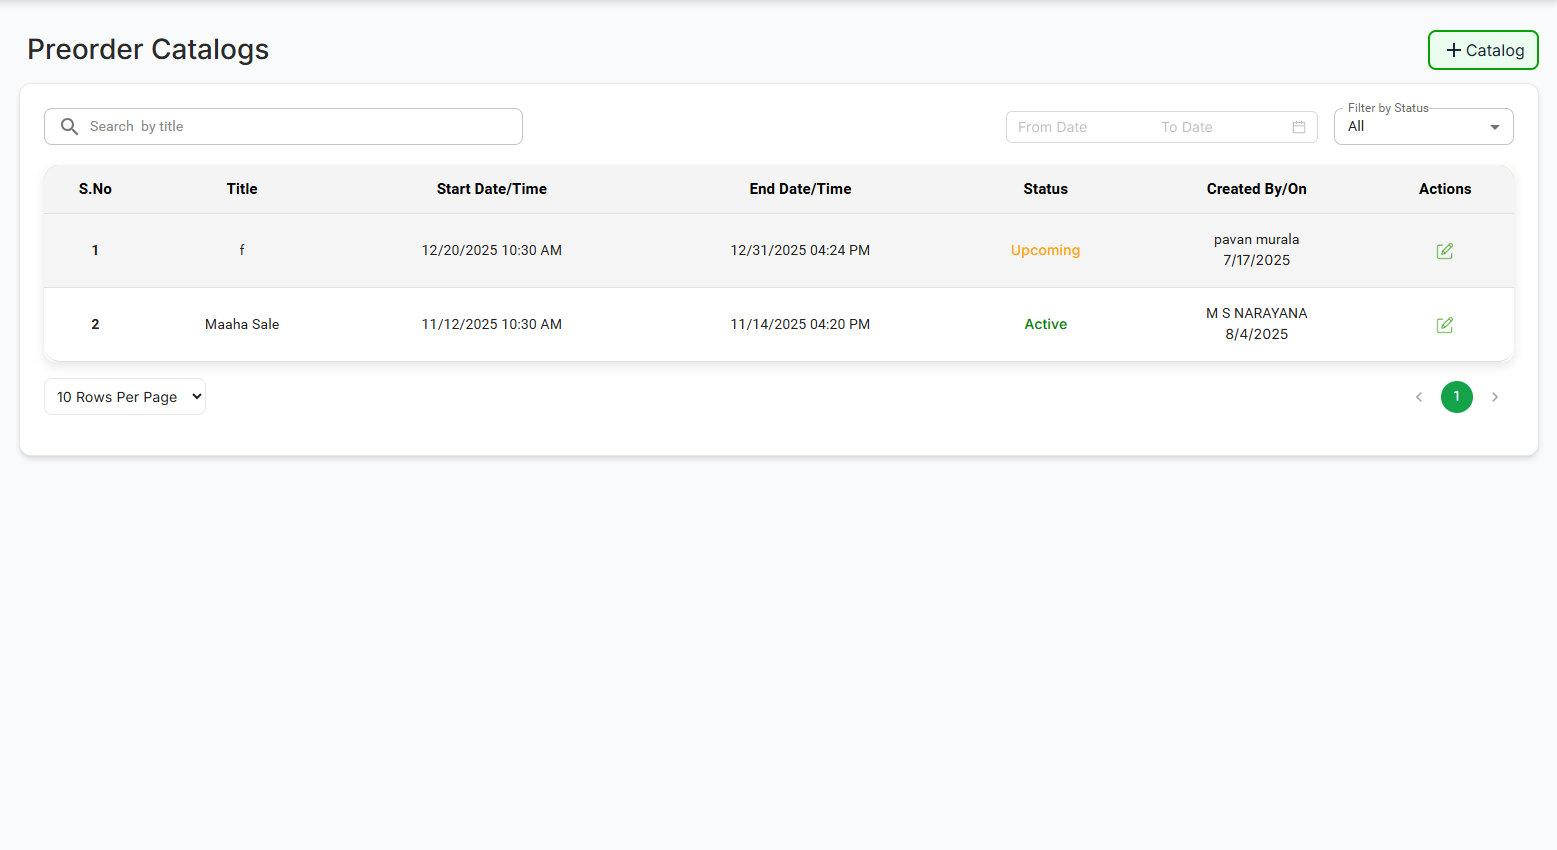
Admin Panel → Preorder Catalogs
✅ Features Available:
- View all catalogs in table format with status badges
- Status Badges:
- Active: Currently visible in e-commerce
- Upcoming: Start date in future
- Expired: Past end date
- Search: Search catalogs by title
- Date Range Filter: Filter by start/end dates
- Status Filter: Filter by Active/Upcoming/Expired
- Edit: Click edit icon to modify catalog
- View Details: See catalog title, dates, created by, status
- Pagination: Navigate through multiple pages
📍 Where Customers See It:
E-Commerce Homepage → Pre-orders Section
✅ How It Works:
Backend automatically filters catalogs based on:
- Current date between startDate and endDate
- Catalog isActive = true
- Catalog isDeleted = false
- Catalog has active products
Only active catalogs appear on the homepage "Pre-orders" section. Each catalog card shows:
- Catalog title and banner image
- Start date and end date
- Fulfillment type (Pickup/Delivery)
- "View" button to see products
- Catalogs with future start dates do not appear until start date arrives
- Catalogs past end date are automatically hidden
- Only one active catalog per fulfillment type shown at a time
- System checks dates in real-time
📍 Where to Find:
E-Commerce → Click on Catalog Card → Catalog Products Page
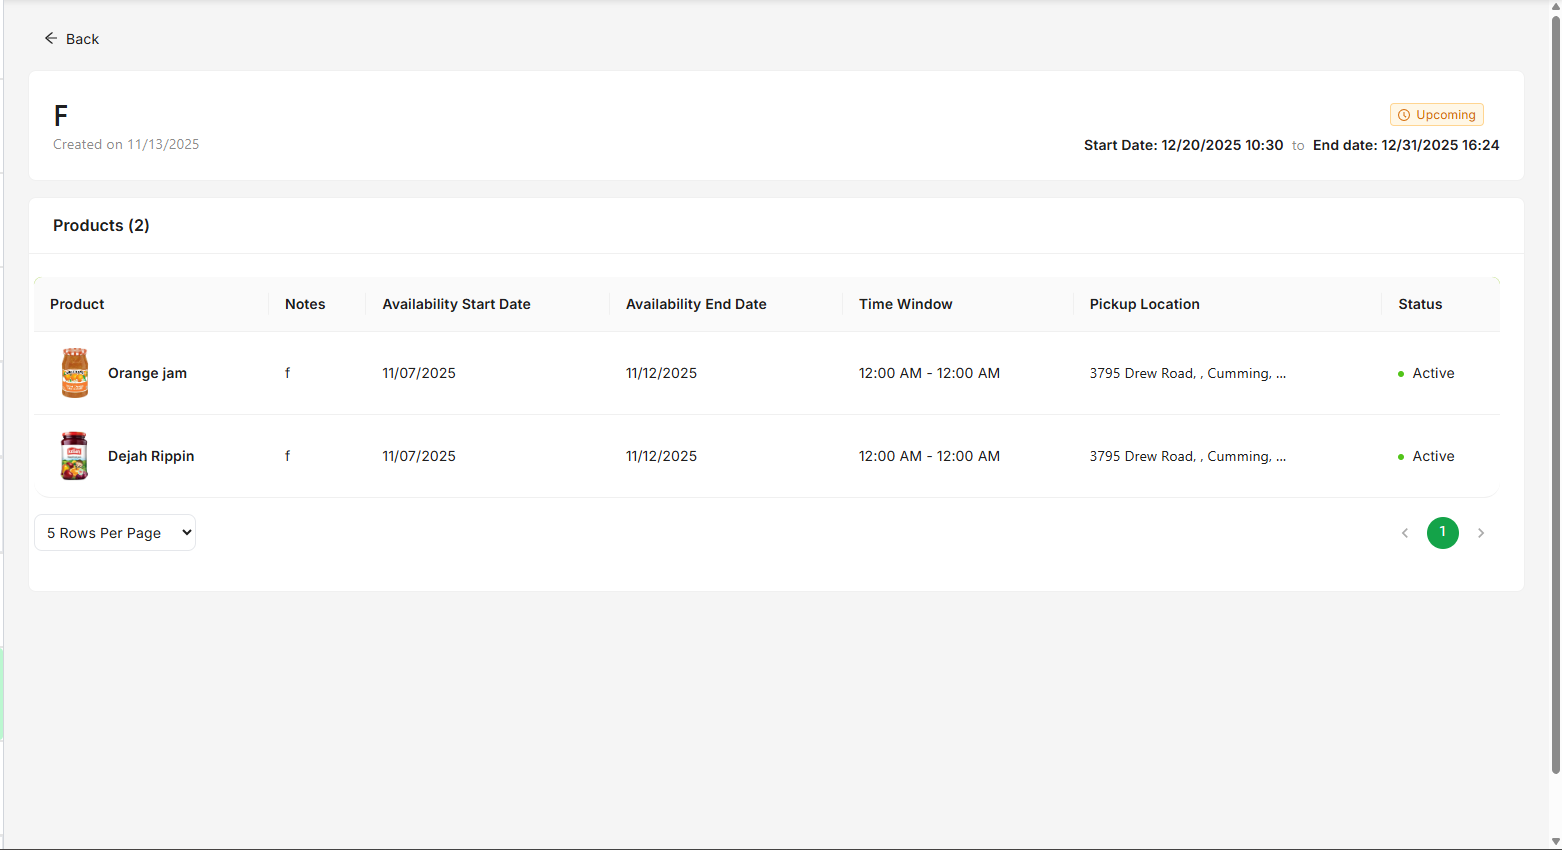
✅ What Customers See:
- Catalog banner image and title
- Start and end dates
- All active products in the catalog
- Product details:
- Product name, image, and price
- Availability dates and times
- Pickup locations (if applicable)
- Pre-order limits
- Product notes/description
- Quantity selector for each product
- "Add to Cart" button for each product
- Share catalog functionality
- Product isActive = true
- Product isDeleted = false
- Fulfillment method matches (pickup/delivery)
📍 Where to Find:
E-Commerce → Catalog Products Page → Click "Add to Cart" on any product
✅ Add to Cart Flow:
Customer clicks on a product in the catalog to view details or directly clicks "Add to Cart"
Customer adjusts quantity using +/- buttons:
- Minimum: 1 item
- Maximum: Pre-order limit for that product
- System validates quantity against available stock
When customer clicks "Add to Cart":
- Product added to cart with selected quantity
- Cart opens automatically showing all items
- Product details saved (price, availability dates, pickup location)
- If same product already in cart, quantity is updated
Cart displays:
- All added products with images
- Quantity for each item
- Price per item and total
- Expected availability dates
- Pickup locations (if applicable)
- Option to remove items or update quantities
- Subtotal and total amount
- Cart persists across sessions (for logged-in users)
- Guest cart stored in browser/localStorage
- Real-time price calculations
- Stock validation before checkout
📍 Where to Find:
Cart Page → Click "Proceed to Checkout"
✅ Checkout Steps:
Customer must be logged in or proceed as guest:
- Logged-in User: Uses existing account
- Guest Checkout: Enter email and verify with OTP
- Guest account created automatically after verification
Choose fulfillment option:
- Pickup: Select pickup location and availability date
- Delivery: Enter shipping address
Enter or select delivery address:
- Street address, city, state, zip code
- System calculates delivery distance
- Delivery charges calculated based on distance
- Free delivery if order meets minimum threshold
Enter coupon code to get discounts:
- Enter coupon code in "Apply Coupon" field
- System validates coupon (validity, minimum order, usage limits)
- Discount applied to order total
- See coupon details in Coupons Section
Review all details before placing order:
- Product list with quantities
- Subtotal
- Coupon discount (if applied)
- Delivery charges (if applicable)
- Final total
- Pickup locations and dates (if pickup)
- Shipping address (if delivery)
Select payment option:
- Credit/Debit Card
- Cash on Delivery (if available)
- Other payment methods configured
📍 Where to Find (Admin):
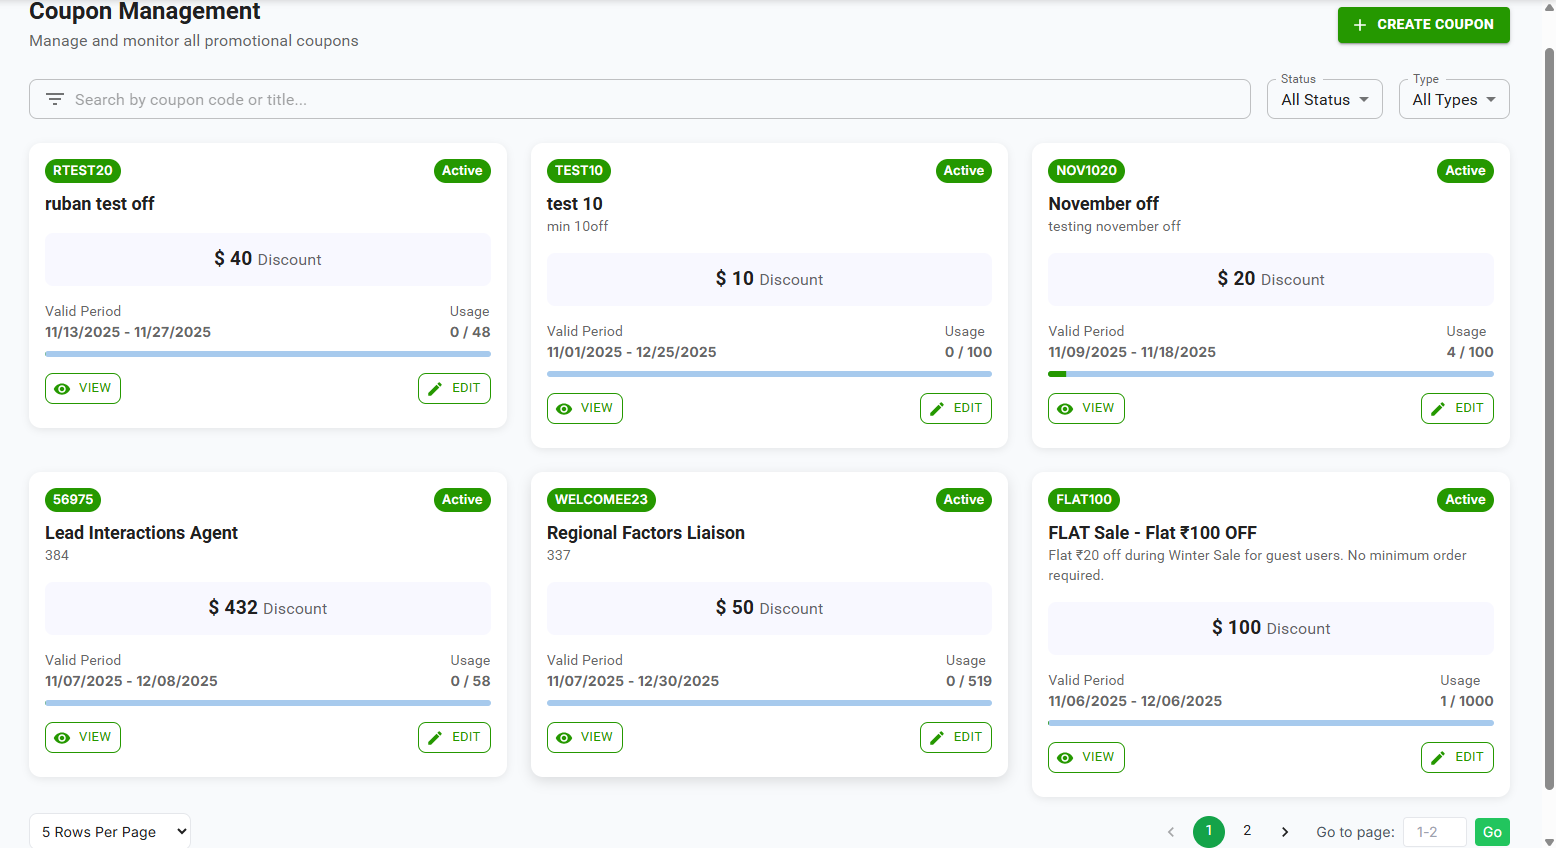
Admin Panel → Admin → Coupons
📍 Where to Find (Customer):
Checkout Page → "Apply Coupon" section
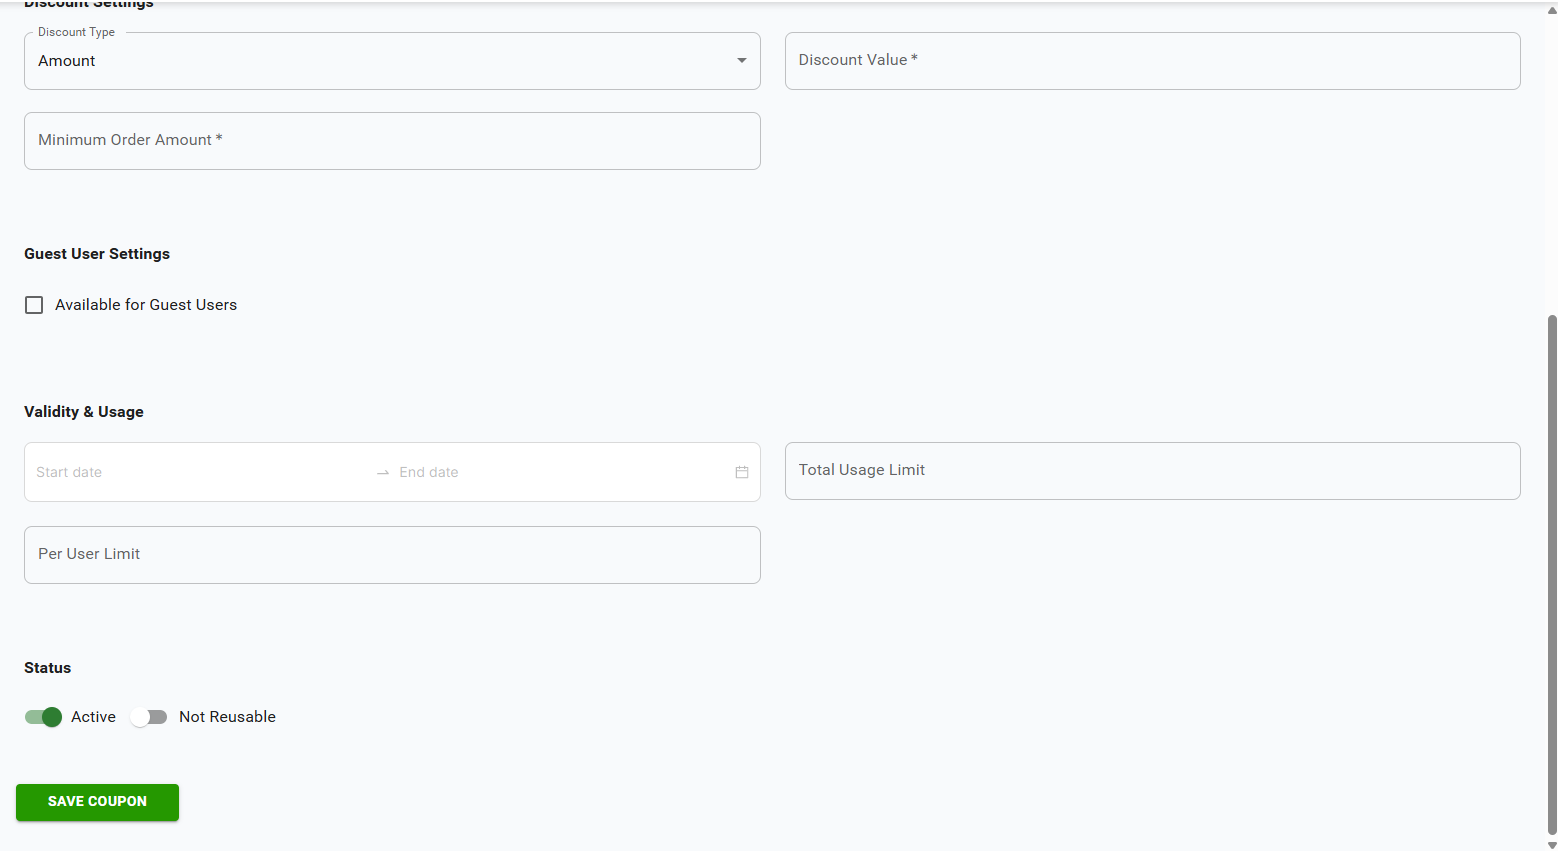
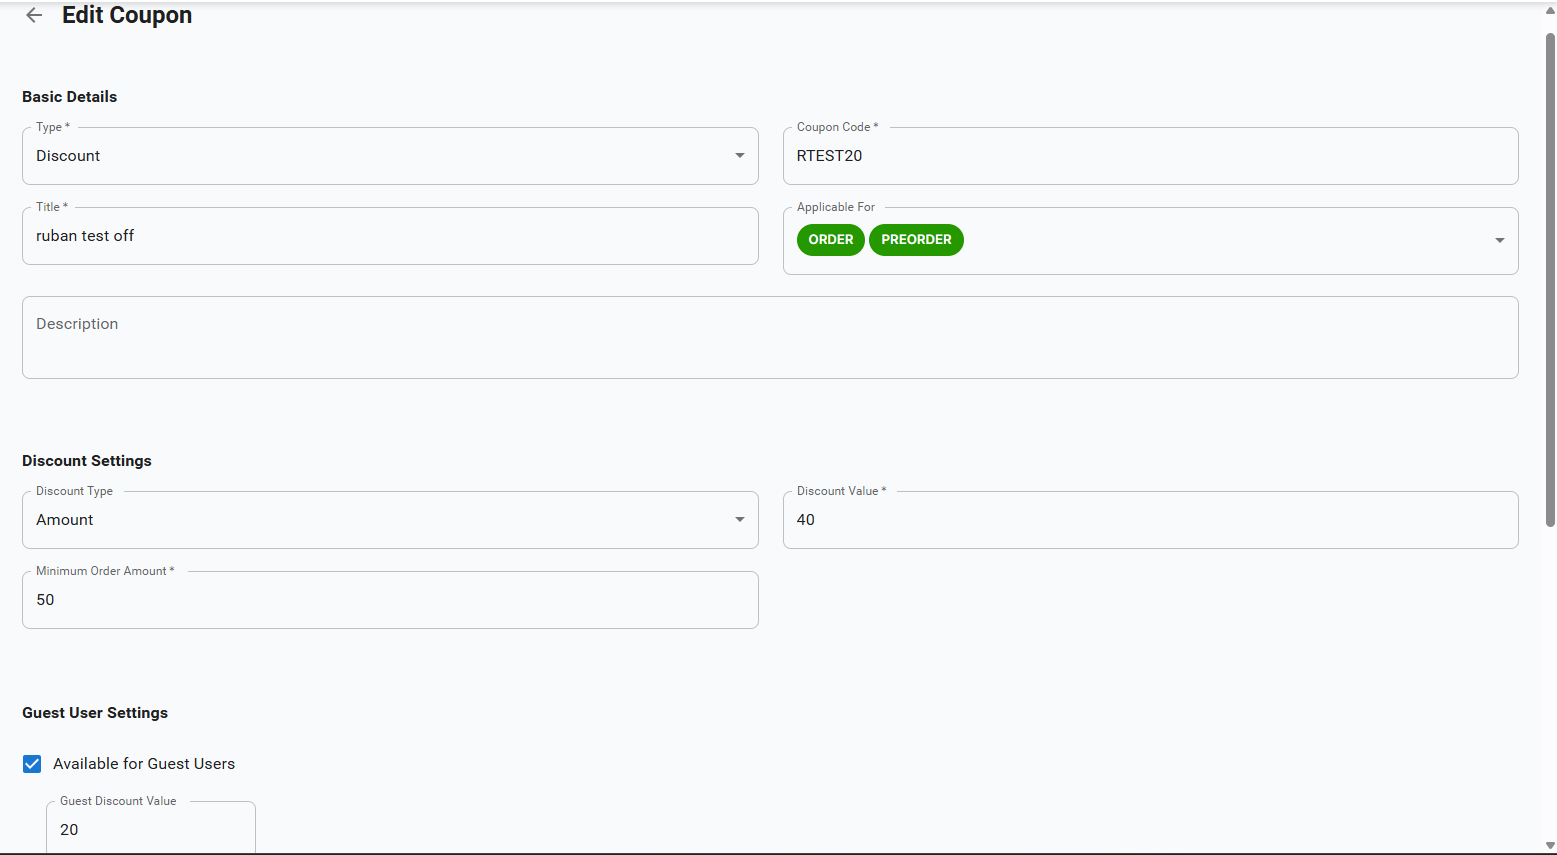
✅ Creating Coupons (Admin):
- Navigate to Admin → Coupons
- Click "Create Coupon" button
- Fill in coupon details:
- Coupon Code: Unique code (e.g., "SPRING20")
- Discount Type: Percentage or Fixed Amount
- Discount Value: Amount or percentage
- Minimum Order Amount: Required order total to use coupon
- Valid From/To: Coupon validity period
- Usage Limit: Total times coupon can be used
- User Limit: Times per customer
- Platform: WEB, MOBILE, or both
- Guest Available: Allow guest customers to use
- Click "Save" to create coupon

✅ Applying Coupons (Customer):
- Go to Checkout Page
- Enter coupon code in "Apply Coupon" field
- Click "Apply" button
- System validates:
- Coupon exists and is active
- Current date within validity period
- Order total meets minimum requirement
- Usage limits not exceeded (global and per-user)
- If valid, discount is applied to order total
- Updated total displayed immediately
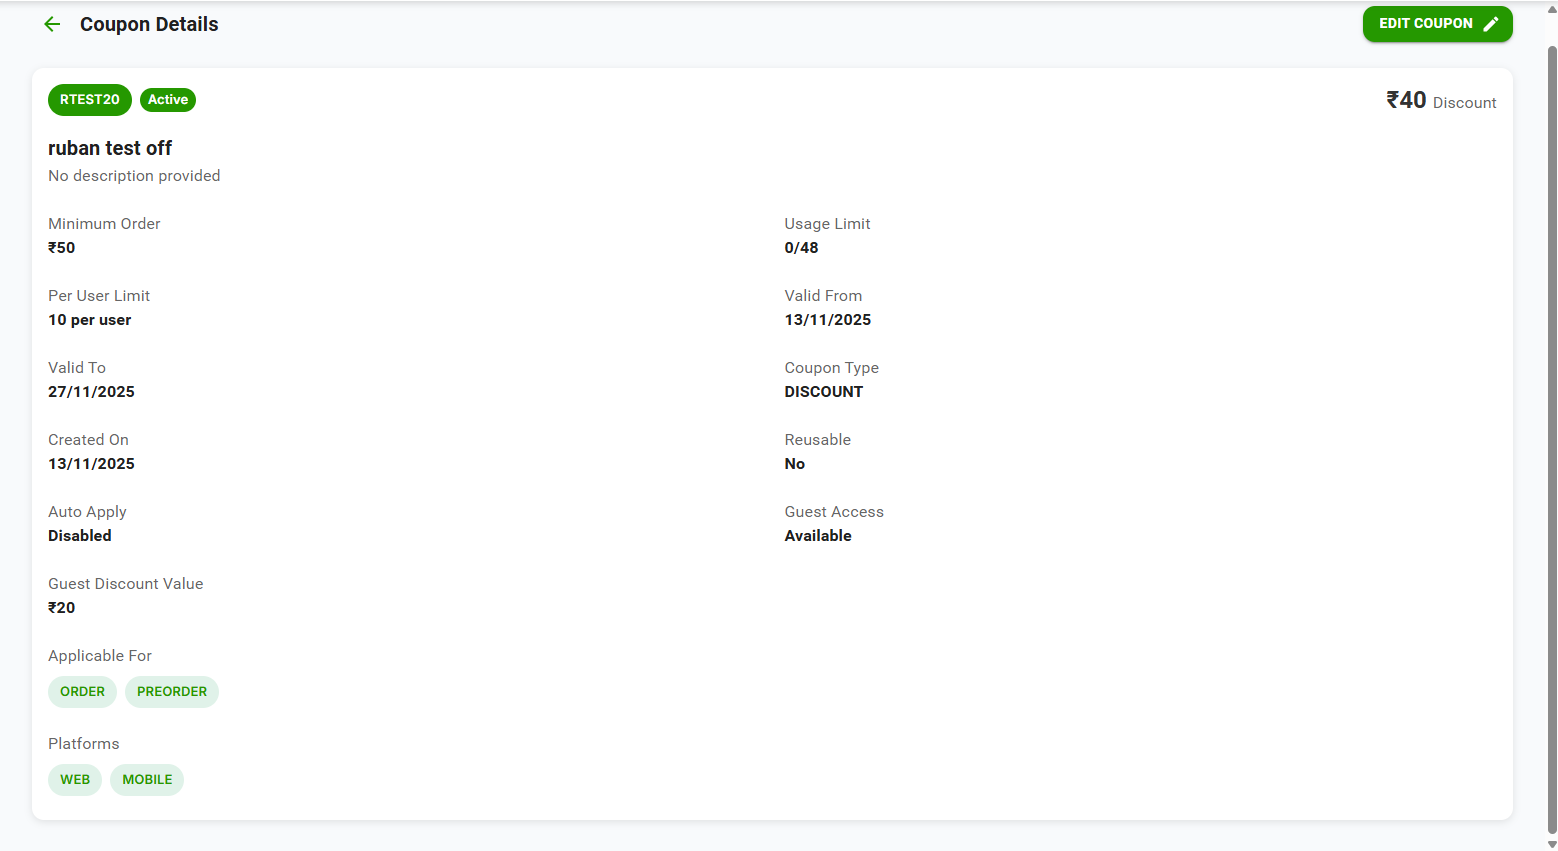
- DISCOUNT: Percentage or fixed amount off
- FREE_DELIVERY: Waives delivery charges
- BOGO: Buy One Get One offers
- WELCOME: For first-time customers only
- Coupon must be active and not deleted
- Current date must be between validFrom and validTo
- Order total must meet minimum order amount
- Global usage limit not exceeded
- Per-user usage limit not exceeded
- Platform must match (WEB/MOBILE)
📍 Where to Find:
Checkout Page → Review Order → Click "Place Order"
✅ Order Placement Process:
Before placing order, system validates:
- All products are still available
- Quantities don't exceed stock limits
- Shipping address is valid (if delivery)
- Pickup location selected (if pickup)
- Payment method is valid
Customer clicks "Place Order" button:
- Order created in system
- Order ID generated
- Order status set to "Pending" or "Draft"
- Confirmation email sent to customer
- Cart is cleared
System saves:
- Customer information
- Product list with quantities and prices
- Applied coupon (if any)
- Discount amount
- Delivery charges
- Final total
- Payment method
- Shipping address (if delivery)
- Pickup location and dates (if pickup)
- Catalog ID (if from catalog)
Customer receives:
- Order confirmation page with order ID
- Email confirmation with order details
- Order tracking information
📍 Where to Find:
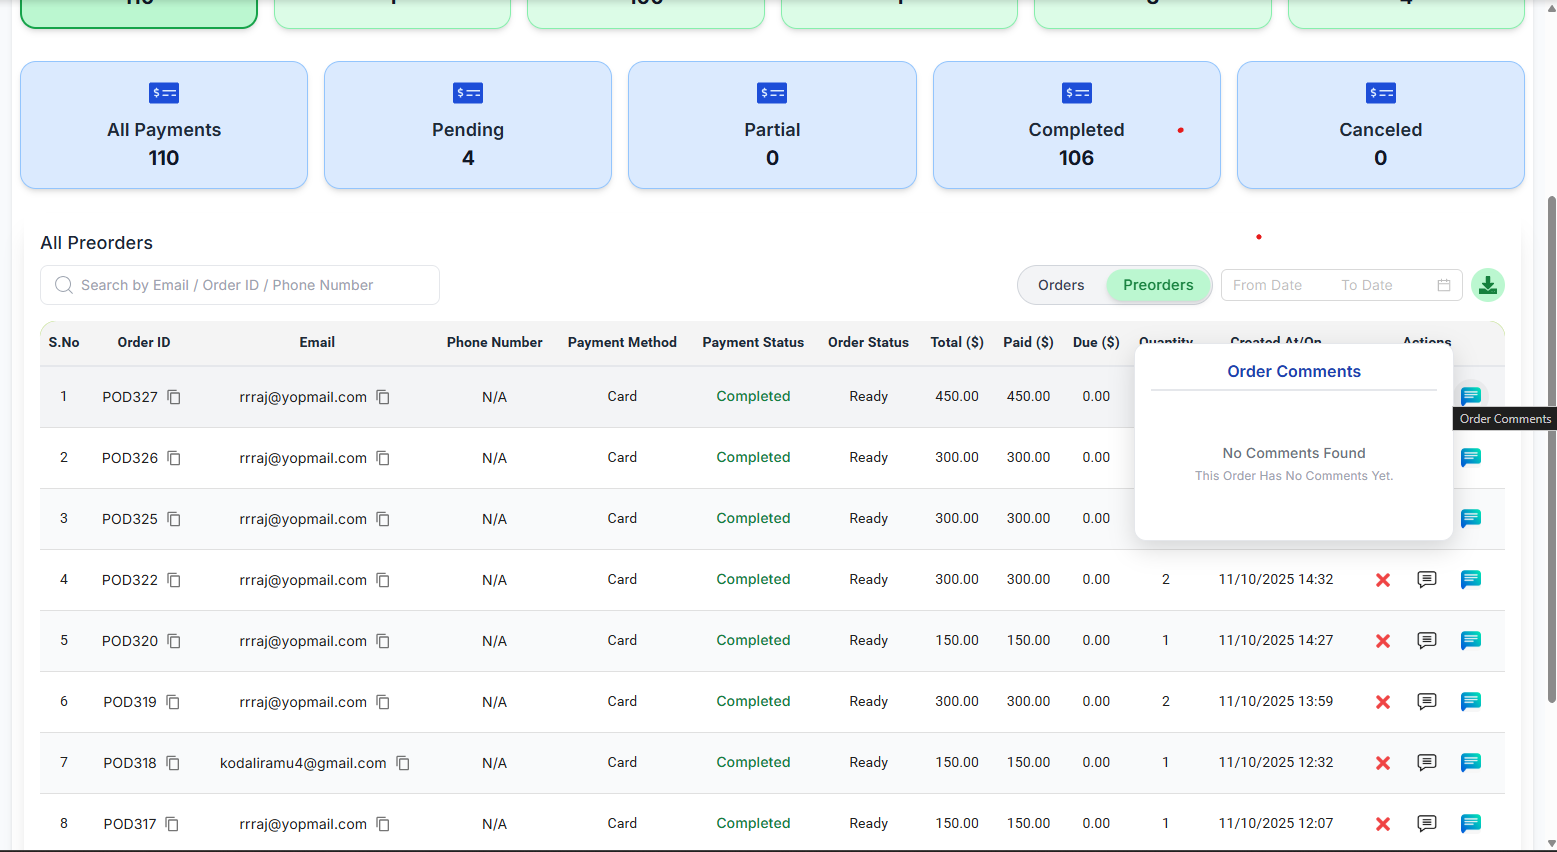
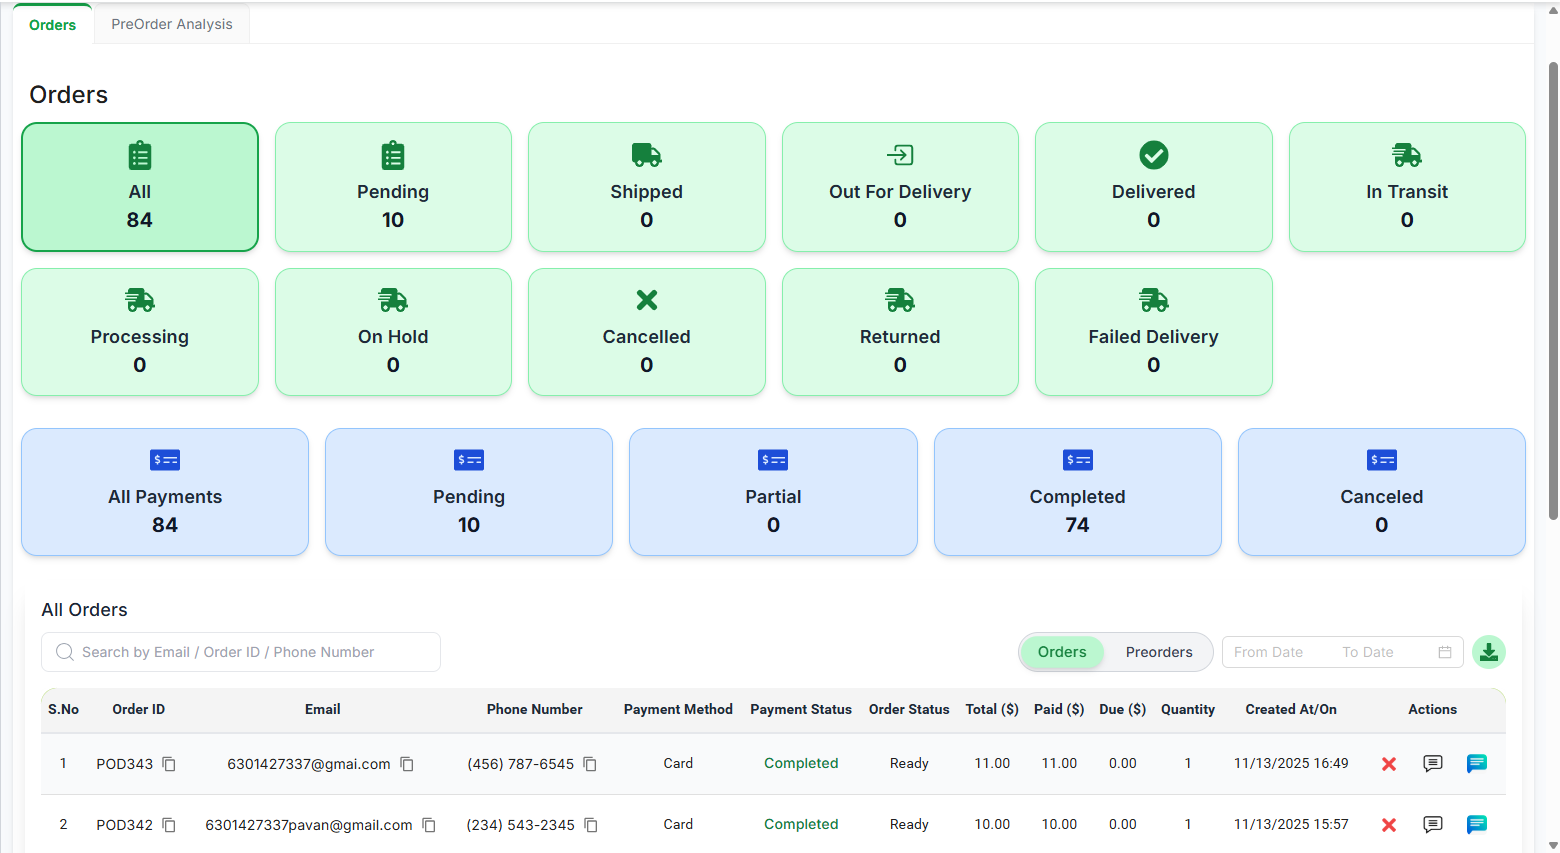
Admin Panel → Admin → My Orders / All Orders
✅ Viewing Orders:
- View all orders in table format
- Filter by status (Pending, Confirmed, Processing, Completed, Cancelled)
- Search orders by order ID, customer name, or email
- Filter by date range
- View order details by clicking on order
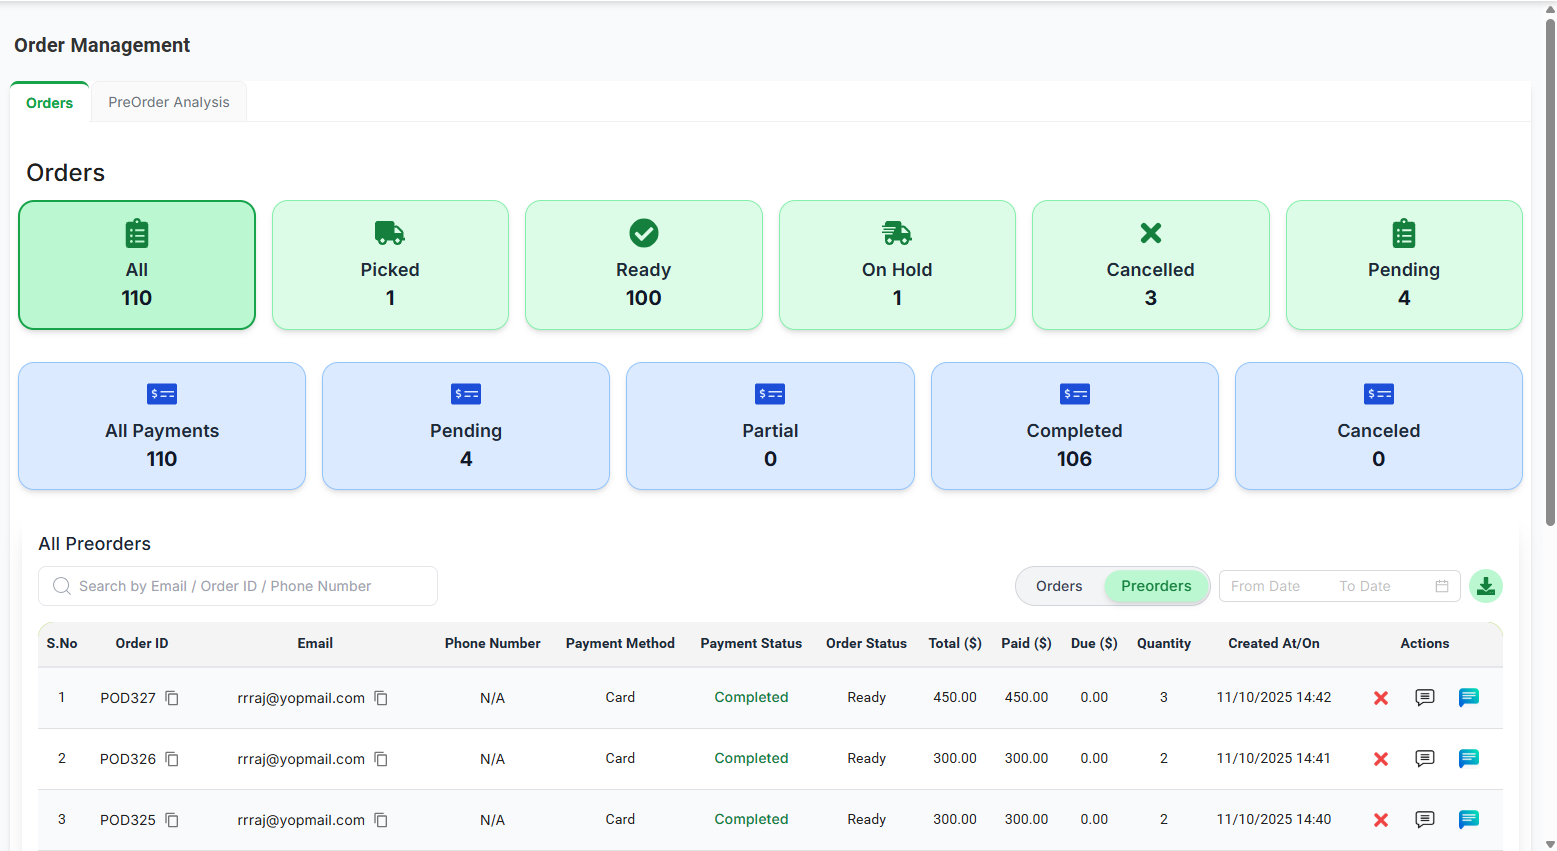
✅ Order Details:
Click on any order to view:
- Customer information
- Order items with quantities and prices
- Applied coupon and discount
- Subtotal, delivery charges, and total
- Payment method and status
- Shipping address (if delivery)
- Pickup location and dates (if pickup)
- Order status and timeline
- Order comments/notes
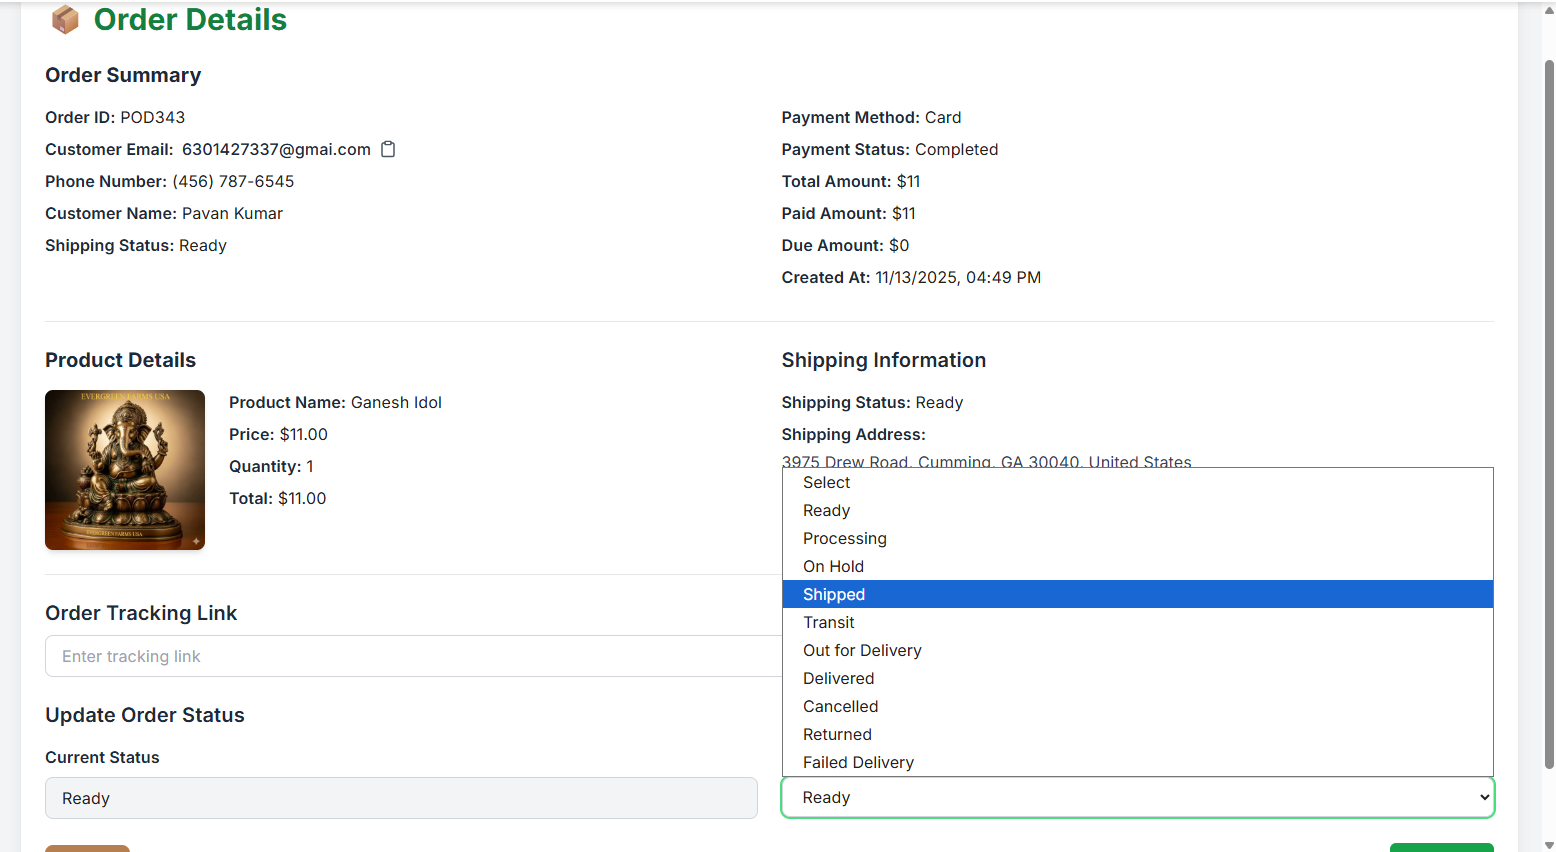
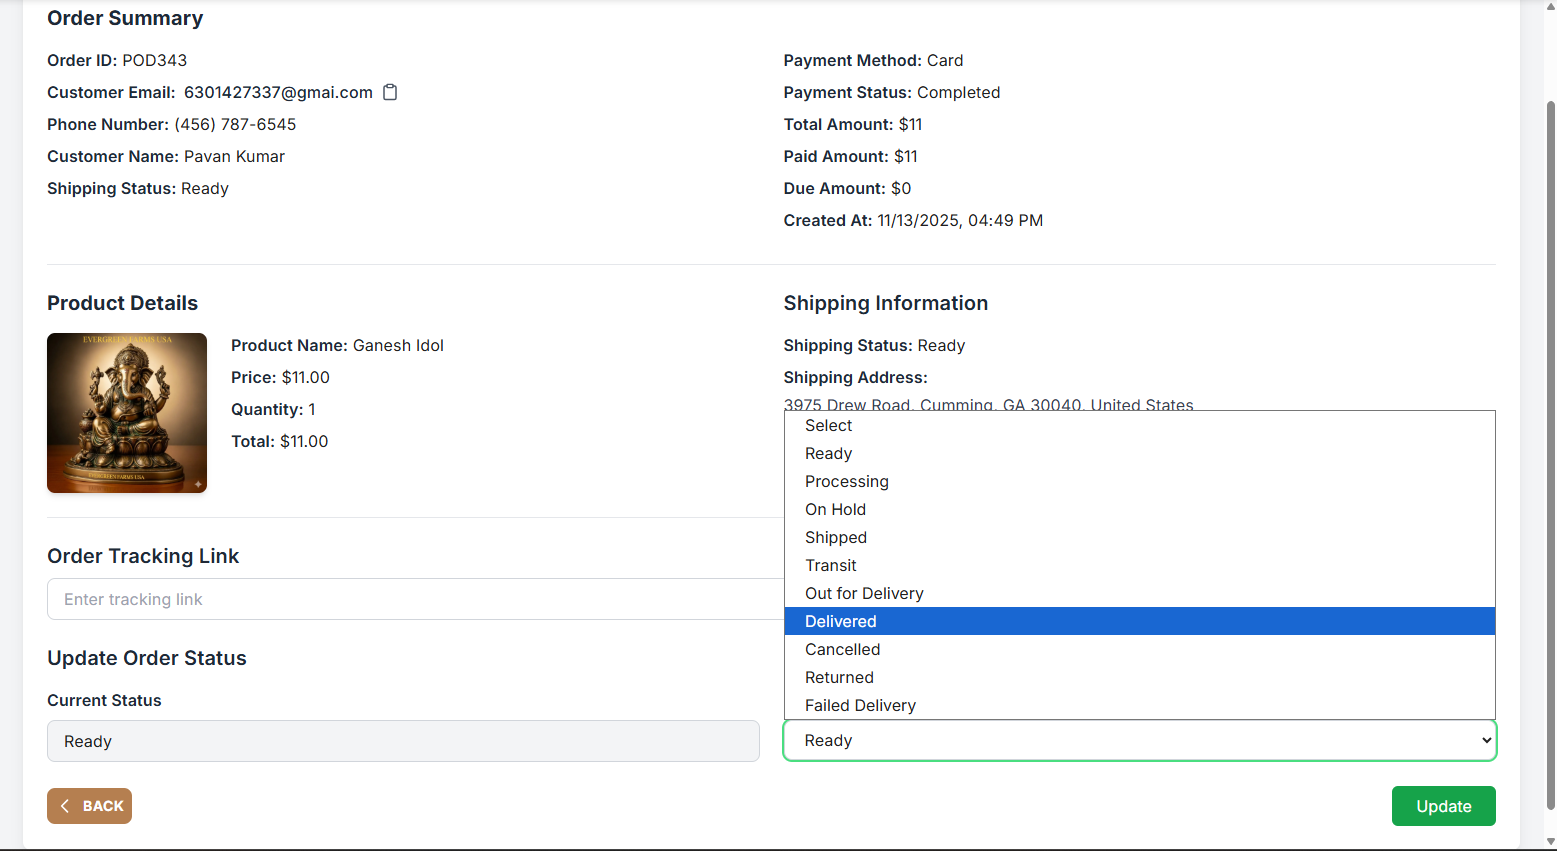
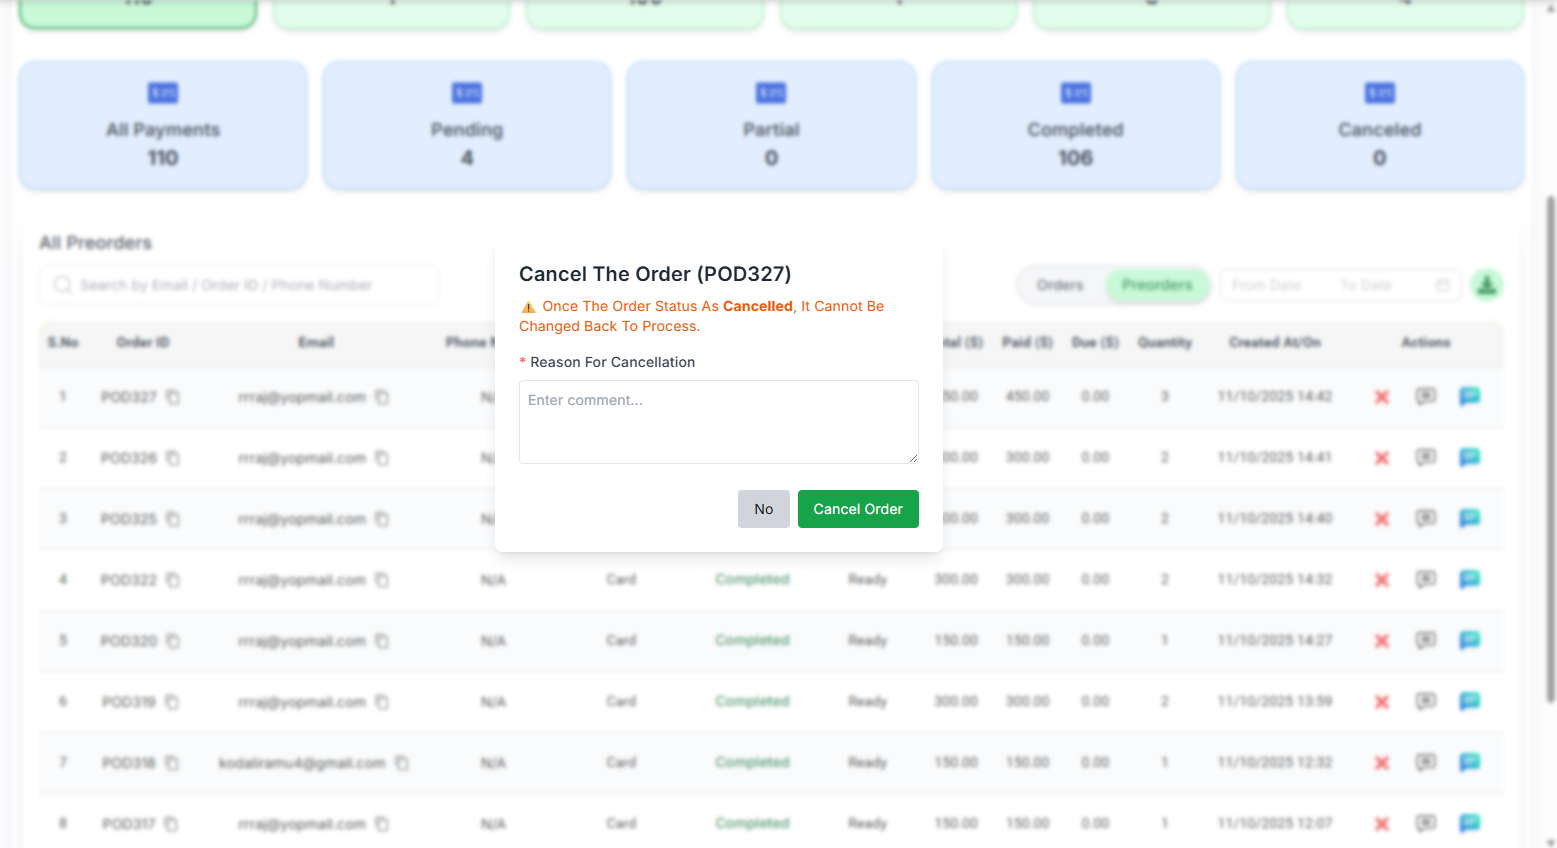
✅ Order Actions:
- Update Status: Change order status (Pending → Confirmed → Processing → Ready → Completed)
- Add Comments: Add notes about the order
- Cancel Order: Cancel order with reason
- View Comments: See all order-related comments
- Print Invoice: Generate and print order invoice
📍 Where to Find:
Admin Panel → Delivery Configurations
✅ What is Delivery Configuration:
Delivery configuration allows you to set up delivery charges and zones based on distance from your business location. You can create separate configurations for:
- Regular Orders: Standard e-commerce orders
- Pre-Orders: Catalog-based pre-orders
- POS Orders: Point of sale orders
- Subscriptions: Subscription-based deliveries
✅ Creating Delivery Configuration:
- Navigate to Delivery Configurations
- Click "Create Configuration"
- Select Applies To: (order/preorder/pos/sub)
- Set up distance ranges:
- Min Distance: Starting distance in miles
- Max Distance: Ending distance (null for unlimited)
- Price: Delivery charge for this range
- Min Order Value: Minimum order for free delivery
- Is Deliverable: Whether delivery is available in this range
- Reason: Message if not deliverable
- Add multiple ranges to cover all distances
- Click "Save" to create configuration
System calculates distance from your business address to customer's delivery address using driving distance. Delivery charges are determined based on which distance range the address falls into.
- Only one active configuration per type (order/preorder/pos/sub)
- Distance ranges must be continuous (no gaps)
- Ranges cannot overlap
- At least one range must be marked as deliverable
📍 Catalog Details:
- Create Catalog: Preorder Catalogs → "+ Catalog" button
- View All Catalogs: Preorder Catalogs page
- Edit Catalog: Preorder Catalogs → Click edit icon
- Catalog Analytics: Preorder Catalogs → Click on catalog → View analytics
📍 Order Details:
- All Orders: Admin → My Orders / All Orders
- Order Details: Click on any order in the list
- Order Comments: Order Details → Comments section
- Cancel Order: Order Details → Cancel button
- Update Status: Order Details → Status dropdown
📍 Coupon Details:
- Create Coupon: Admin → Coupons → "Create Coupon"
- View All Coupons: Admin → Coupons
- Edit Coupon: Coupons → Click edit icon
- Coupon Details: Coupons → Click on coupon
- Coupon Analytics: Coupon Details → Analytics tab
📍 Delivery Configuration:
- View Configurations: Delivery Configurations page
- Create Configuration: Delivery Configurations → "Create" button
- Edit Configuration: Click on configuration card
- View Details: Click "View" on configuration card
📍 Customer View (E-Commerce):
- View Catalogs: E-Commerce Homepage → Pre-orders section
- View Products: Click on catalog card
- Add to Cart: Product page → "Add to Cart" button
- View Cart: Cart icon in header or after adding product
- Checkout: Cart → "Proceed to Checkout"
- Apply Coupon: Checkout page → "Apply Coupon" section
- Place Order: Checkout page → "Place Order" button
📍 Where to Find:
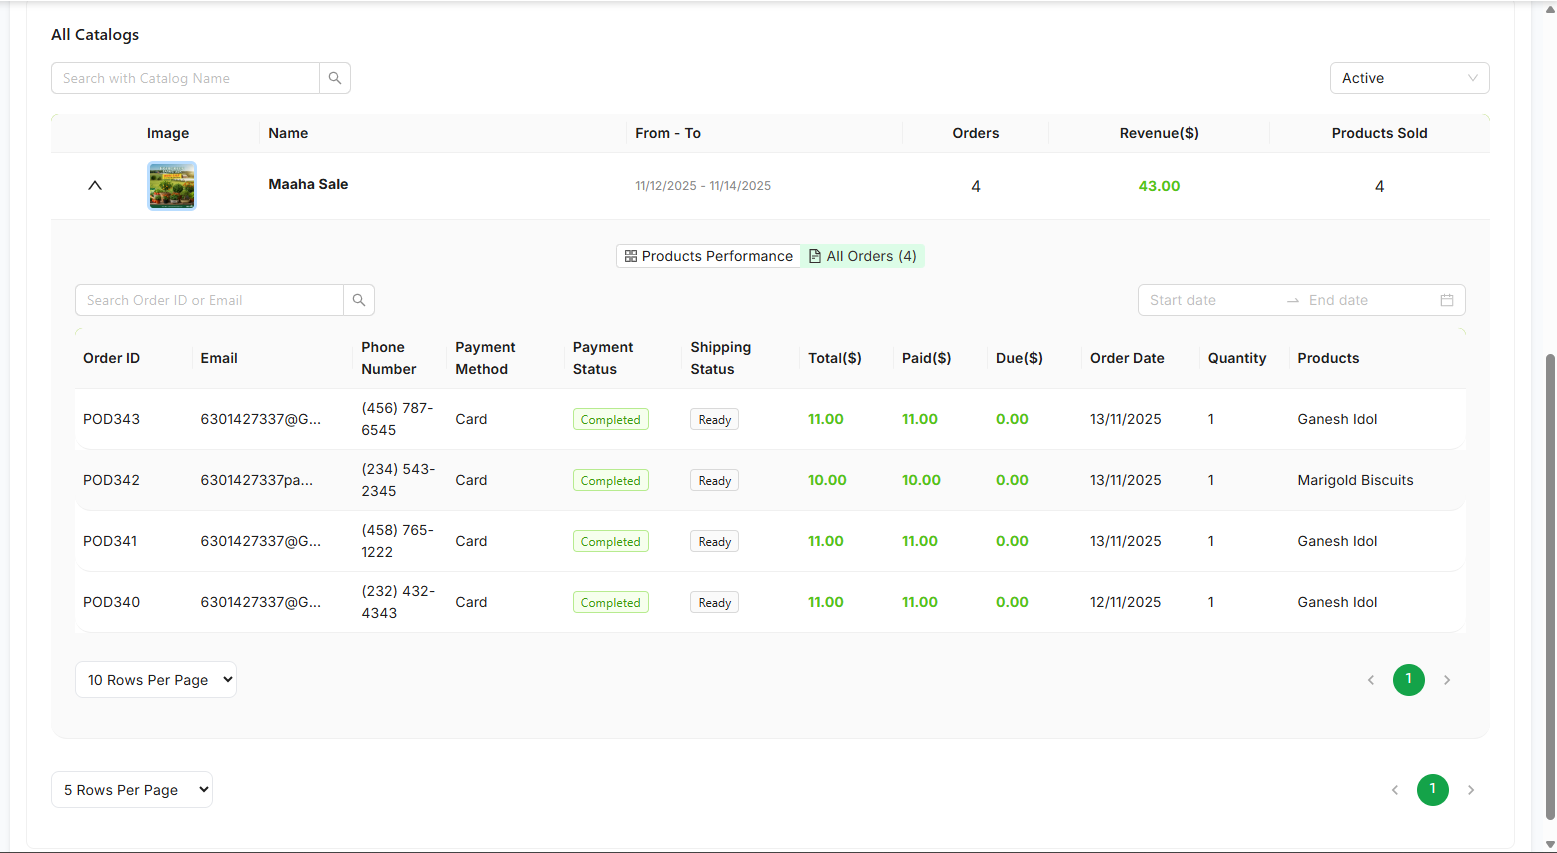
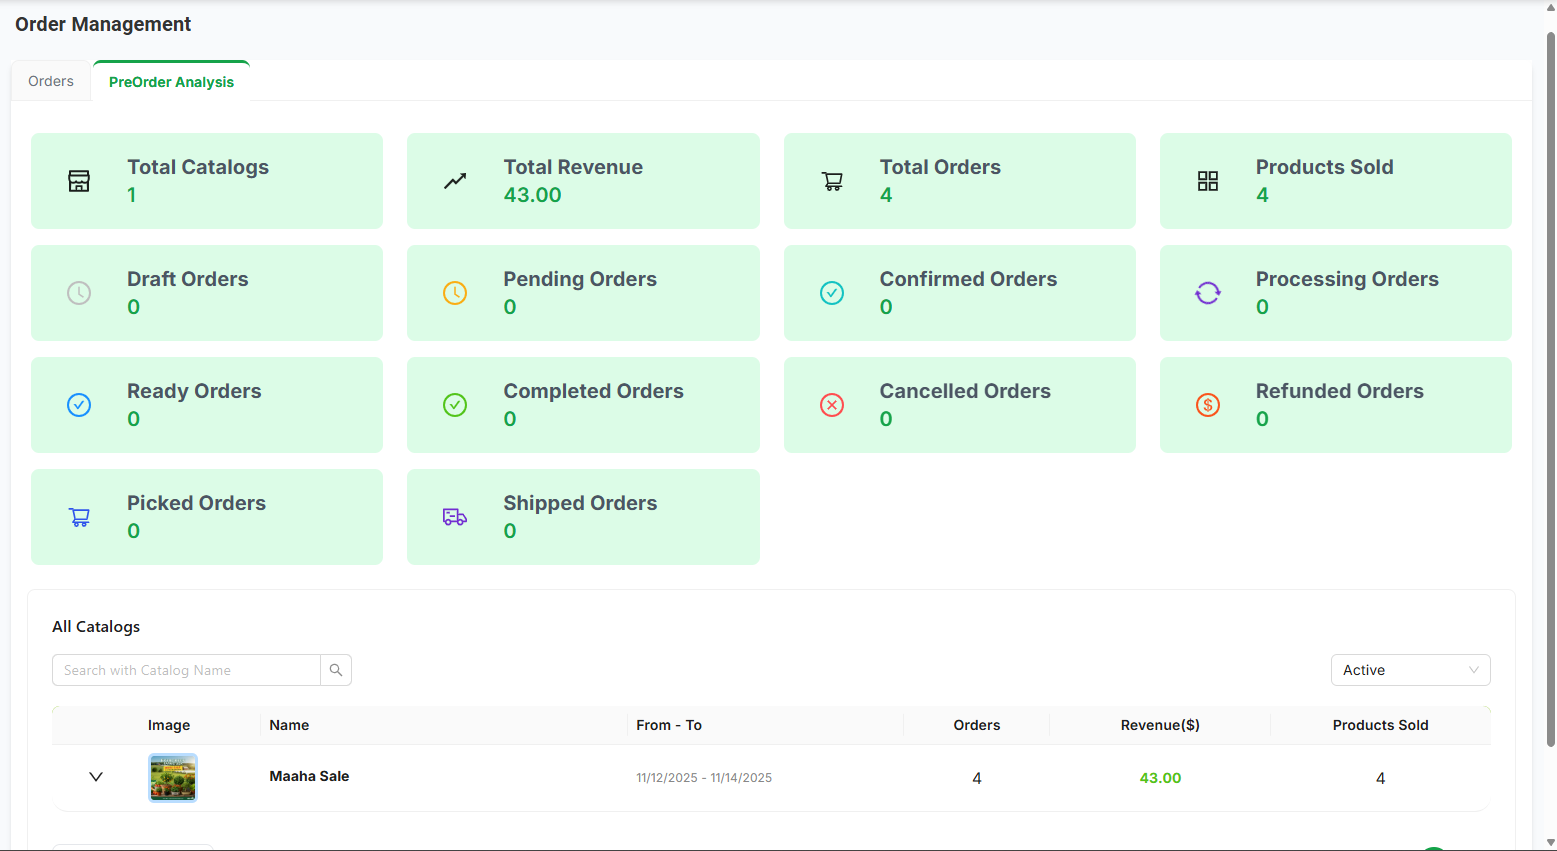
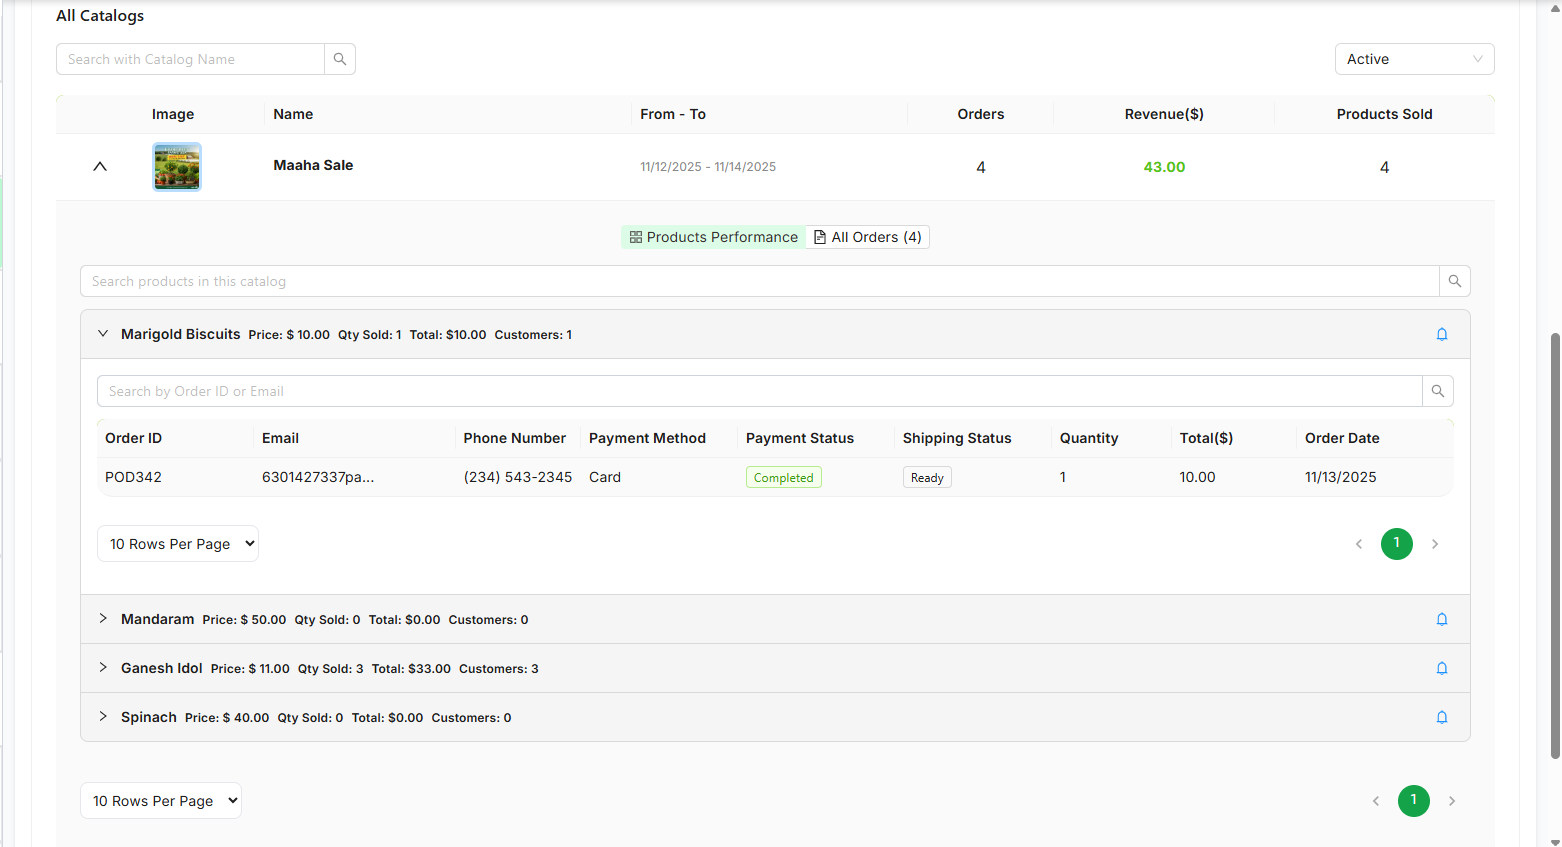
Admin Panel → Preorder Catalogs → Click on catalog → Analytics tab
✅ Analytics Available:
- Total Products Sold: Sum of all quantities ordered
- Total Revenue: Total sales amount from catalog
- Total Orders: Number of orders placed
- Status Breakdown: Orders by status (pending, confirmed, completed, cancelled, etc.)
- Product Performance: Individual product sales and revenue
- Order Details: List of all orders from this catalog
Common Issues & Solutions:
- Check if current date is between start date and end date
- Verify catalog status is "Active"
- Ensure catalog is not deleted
- Check if catalog has at least one active product
- Verify products match fulfillment method (pickup/delivery)
- Verify products are active and not deleted
- Check if products match the fulfillment method
- Ensure products have valid product IDs
- Check product availability dates
- Check coupon is active and not deleted
- Verify current date is within coupon validity period
- Ensure order total meets minimum order amount
- Check if usage limits are exceeded
- Verify coupon platform matches (WEB/MOBILE)
- Check delivery configuration exists for order type
- Verify distance calculation is correct
- Check if order total qualifies for free delivery
- Ensure address is within deliverable range
- Check if products are still in stock
- Verify quantities don't exceed limits
- Ensure shipping address is complete (if delivery)
- Check if pickup location is selected (if pickup)
- Verify payment method is valid
- Admin Creates Catalog: Set title, dates, image, products, fulfillment method
- Catalog Appears in E-Commerce: Automatically when current date is within start/end dates
- Customer Views Catalog: Sees catalog on homepage, clicks to view products
- Customer Adds to Cart: Selects products, sets quantities, adds to cart
- Customer Checks Out: Authenticates, selects delivery method, enters address
- Customer Applies Coupon: Enters coupon code, discount applied
- Customer Places Order: Reviews and confirms order
- Admin Manages Order: Views order, updates status, processes fulfillment
- Admin Views Analytics: Tracks catalog performance and sales
Key Features: Time-based automatic display, seamless add-to-cart, coupon integration, flexible delivery configuration, comprehensive order management, and detailed analytics.